
Introduction to Chilled Bliss: Frozen Yogurt Banana Bread Slices
If you’re searching for a delightful and refreshing dessert to enjoy on a warm day, look no further than Frozen Yogurt Banana Bread Slices. This innovative recipe combines the natural sweetness of ripe bananas with the creamy richness of yogurt, resulting in a unique treat that satisfies your sweet tooth while offering a healthier alternative to traditional desserts. Chilled Bliss is not only a fantastic way to utilize overripe bananas but also an invitation to explore a delicious twist on classic banana bread.
Originating from the home kitchens of health-conscious bakers, this recipe has gained popularity for its ability to merge comfort food with nutritious ingredients. Many people are now seeking ways to indulge in their favorite flavors without the guilt that often accompanies traditional desserts. The combination of bananas and yogurt serves as a foundation for this recipe, allowing for a moist, flavorful loaf that can be enjoyed on its own or transformed into a frozen delight.
In this article, we will guide you through every step of the process, ensuring that your Frozen Yogurt Banana Bread Slices turn out perfectly every time. From preparation to baking—and ultimately freezing—this recipe is as simple as it is delicious, making it the ideal choice for both novice and experienced bakers alike.
Understanding the Ingredients
To create the perfect Frozen Yogurt Banana Bread Slices, it’s essential to understand the role each ingredient plays in the recipe. Let’s explore the core components that contribute to the flavor, texture, and overall success of this delightful dish.
Ripe Bananas
One of the primary ingredients in this recipe is ripe bananas, which are crucial for adding natural sweetness and moisture to the bread. The browner the bananas, the sweeter and more flavorful they become. This is due to the breakdown of starches into sugars as the fruit ripens, making them an excellent choice for baking. When selecting bananas for your recipe, aim for those with plenty of brown spots, as they will impart the best flavor and texture.
All-Purpose Flour
All-purpose flour serves as the foundation for structure and texture in banana bread. It provides the necessary backbone to hold the loaf together while contributing to its density. When measuring flour, it’s important to avoid compacting it into your measuring cup, as this can lead to a denser loaf. Instead, spoon the flour into the cup and level it off with a knife for the most accurate measurement.
Baking Soda and Baking Powder
These two leavening agents are essential for achieving a fluffy loaf. Baking soda reacts with the natural acidity in the bananas and yogurt, helping the bread rise and develop a light texture. Baking powder, on the other hand, provides an additional lift, ensuring that the banana bread doesn’t become too dense. Using both ensures a balanced rise and contributes to the overall fluffiness of the final product.
Ground Cinnamon
Adding ground cinnamon not only enhances the flavor profile of the banana bread but also introduces warmth and depth. This spice complements the sweetness of the bananas and adds a comforting aroma during baking. Cinnamon is a staple in many banana bread recipes, and its subtle earthiness elevates the overall taste, making each bite even more enjoyable.
Greek Yogurt
Greek yogurt is a star ingredient in this recipe, imparting richness while also offering a protein boost. Its creamy texture helps create a moist crumb and adds a slight tang that balances the sweetness of the bananas. Additionally, using Greek yogurt instead of oil or butter reduces the overall fat content of the bread while maintaining a satisfying mouthfeel.
Optional Add-Ins
While the base recipe is delightful on its own, consider adding optional ingredients like chopped nuts or chocolate chips for extra texture and taste. Walnuts or pecans provide a satisfying crunch, while chocolate chips introduce a decadent sweetness that pairs beautifully with the bananas. Feel free to customize your Frozen Yogurt Banana Bread Slices according to your preferences!
Preparation Steps for Frozen Yogurt Banana Bread
Now that you understand the key ingredients, it’s time to dive into the preparation steps for making your Frozen Yogurt Banana Bread. Each step is designed to ensure that your bread turns out perfectly, with a moist crumb and vibrant flavors.
Preheating and Preparing the Pan
Before you begin mixing your ingredients, it’s essential to preheat your oven to 350°F (175°C). Preheating allows for even baking and ensures that your bread rises properly. While the oven is warming up, prepare your loaf pan. Greasing it with butter or oil is a common method, but for easy removal, consider lining the pan with parchment paper. This not only prevents sticking but also makes cleanup a breeze.
Mixing Dry Ingredients
Next, it’s time to combine the dry ingredients. In a medium bowl, whisk together the all-purpose flour, baking soda, baking powder, ground cinnamon, and a pinch of salt. Each ingredient plays a specific role: the flour provides structure, the baking soda and powder create lift, and the salt enhances the overall flavor. Whisking the ingredients together helps to ensure even distribution, preventing any clumps in your batter and contributing to a uniform texture in the final loaf.
Combining Wet Ingredients
In a separate large bowl, mash your ripe bananas until smooth. This is where the sweetness comes to life! To the bananas, add the Greek yogurt and mix thoroughly until you achieve a creamy consistency. The key to a successful banana bread is to ensure that the wet ingredients are well combined, which helps to distribute the flavor evenly throughout the loaf. If desired, you can also add eggs at this stage to enhance the richness and binding.
Integrating Wet and Dry Mixtures
Once your wet and dry ingredients are prepared, it’s time to combine them. Carefully fold the dry ingredients into the wet mixture using a spatula or wooden spoon. It’s important to avoid overmixing at this stage, as doing so can lead to a tough loaf. Gently incorporate the flour until just combined, leaving a few small streaks of flour. If you’re adding optional ingredients like nuts or chocolate chips, fold them in at this point, ensuring they are evenly distributed throughout the batter.
Baking the Banana Bread
With the batter ready, the next steps focus on baking the banana bread to perfection. This is where the magic happens, transforming your mixture into a delicious loaf that you can enjoy chilled or frozen.
Key Baking Techniques
Transfer the batter into your prepared loaf pan and smooth the top with a spatula. To ensure even baking, place the pan in the center of the preheated oven. Baking times may vary depending on your oven, but generally, you should expect the bread to bake for about 50-60 minutes. To check for doneness, perform the toothpick test: insert a toothpick into the center of the loaf, and if it comes out clean or with a few moist crumbs, your banana bread is ready.
By following these initial steps, you’re well on your way to creating a delightful Frozen Yogurt Banana Bread that is sure to impress your family and friends. Stay tuned for the next part of the article, where we will dive deeper into the baking process and how to achieve that perfect frozen treat!
{{image_2}}
Cooling Process
Once your banana bread is baked to perfection, the cooling process is a crucial step that shouldn’t be overlooked. Cooling your banana bread in the pan for about 10-15 minutes before transferring it to a wire rack allows it to settle and firm up, ensuring that it retains its shape. This initial cooling period also helps prevent the bread from sticking to the pan, making it easier to remove without crumbling.
Why Cooling in the Pan and Then on a Wire Rack Matters
After the initial cooling, transferring the banana bread to a wire rack is essential. This allows air to circulate around the bread, preventing moisture buildup that could lead to a soggy bottom. A soggy texture can drastically affect the quality of your banana bread, especially when preparing it for freezing. Proper cooling helps maintain the moisture balance within the bread, resulting in a soft, tender texture even after freezing and thawing.
Tips for Maintaining Moisture in the Bread
To ensure your banana bread remains moist, consider these tips:
1. Use Ripe Bananas: Overripe bananas not only impart natural sweetness but also contain more moisture, which is crucial for a moist bread.
2. Don’t Overmix: Mixing the batter too much can lead to dense bread. Gently fold in the dry ingredients until just combined.
3. Store Properly: Once cooled, wrap the banana bread tightly in plastic wrap or aluminum foil to prevent it from drying out before freezing.
Preparing the Frozen Yogurt Topping
The frozen yogurt topping is the star of this dish, elevating your banana bread slices into a refreshing dessert experience. Choosing the right yogurt and sweetening options can make all the difference.
Ingredients for the Yogurt Topping
Choosing the Right Type of Greek Yogurt: Plain vs. Flavored
When selecting Greek yogurt for your topping, consider using plain Greek yogurt for a healthier option. Plain yogurt allows you to control the sweetness while providing a creamy texture that complements the banana bread. If you prefer a flavored yogurt, look for options that are low in sugar and made with natural flavors to enhance the taste without overwhelming it.
Sweetening Options: Honey, Maple Syrup, and Their Flavors
For sweetening your yogurt, options like honey and maple syrup not only add sweetness but also impart unique flavors. Honey has floral notes that can add depth, while maple syrup contributes a warm, earthy sweetness. For a lighter option, you could also consider agave nectar or even a sugar substitute, depending on your dietary preferences.
Mixing the Topping
Techniques for Achieving a Smooth Consistency
To ensure your yogurt topping is smooth and creamy, start by mixing the yogurt in a bowl with a whisk or an electric mixer. Gradually add your chosen sweetener until fully incorporated. If you want to elevate the flavor, consider adding a splash of vanilla extract or a pinch of salt to enhance the sweetness and balance the flavors.
Optional Flavor Enhancements, Such as Ground Cinnamon
For an extra layer of flavor, consider incorporating spices like ground cinnamon or nutmeg. Just a small amount can add warmth and complexity to your topping, making it even more delicious. Experiment with different spices to find your perfect combination.
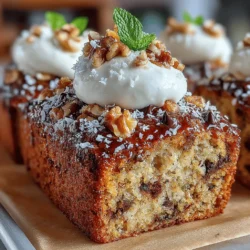
Creating and Freezing the Banana Bread Slices
Now that your banana bread is cooled and your yogurt topping is ready, it’s time to slice and freeze.
Slicing the Bread
Best Practices for Slicing to Ensure Even Portions
Use a sharp bread knife for clean cuts, and let the banana bread rest for at least 30 minutes after cooling to make slicing easier. Aim for slices that are about 1 inch thick; this thickness allows for a good balance of bread and yogurt topping, ensuring each bite is satisfying.
Tips for Freezing Banana Bread to Maintain Texture
When freezing, place the banana bread slices on a baking sheet lined with parchment paper in a single layer. This prevents them from sticking together. Freeze them for about 1-2 hours until firm, then transfer the slices to an airtight container or freezer bag. Label the container with the date, and they can last up to three months in the freezer.
Topping Each Slice
How to Generously Spread Yogurt for Maximum Flavor
Once the banana bread slices are frozen, it’s time to top each slice with your yogurt mixture. Use a spatula or a butter knife to spread a generous layer of yogurt on each slice. You want enough yogurt to balance the sweetness of the banana bread, so don’t be shy!
Importance of Refreezing the Topped Slices
After topping the slices, place them back in the freezer for at least an hour. This step is vital as it allows the yogurt to freeze slightly, creating a delightful contrast between the creamy yogurt and the soft banana bread.
Serving Suggestions for Frozen Yogurt Banana Bread Slices
Ideal Serving Temperature
For the best texture and flavor experience, allow the frozen yogurt banana bread slices to sit at room temperature for about 5-10 minutes before serving. This short thawing time softens the yogurt while keeping the banana bread chilled, providing a perfect bite.
Pairing Suggestions for a Complete Dessert Experience
To enhance the dessert experience, consider pairing these banana bread slices with fresh fruits such as berries or sliced peaches. A sprinkle of chopped nuts, like walnuts or pecans, can add a satisfying crunch. You might also serve them alongside a scoop of your favorite ice cream or a drizzle of chocolate sauce for an indulgent treat.
Nutritional Benefits of Frozen Yogurt Banana Bread Slices
Health Benefits of Ingredients
These frozen yogurt banana bread slices are not just delicious but also packed with nutritional benefits. Bananas are a fantastic source of potassium, vitamin C, and dietary fiber, making them a heart-healthy choice. Greek yogurt adds protein and probiotics, which are excellent for gut health. If you include nuts, they provide healthy fats and additional protein, creating a well-rounded dessert that fits into a balanced diet.
How This Dessert Fits into a Balanced Diet
Incorporating these frozen yogurt banana bread slices into your diet can be a smart choice. They can serve as a refreshing snack or dessert option that satisfies your sweet tooth without the guilt. This recipe allows you to enjoy a treat while benefiting from the nourishing qualities of its ingredients, making it an excellent addition to your healthy eating routine.
Conclusion: Enjoying Your Frozen Yogurt Banana Bread Slices
These Frozen Yogurt Banana Bread Slices offer a delightful twist on traditional desserts, combining the comforting taste of banana bread with the refreshing qualities of yogurt. With simple ingredients and straightforward steps, you can create a delicious treat that your family and friends will love. Whether you are enjoying them on a warm afternoon or as a sweet finish to a meal, these frozen delights are sure to bring joy and satisfaction. Embrace the flavors, appreciate the health benefits, and relish the experience of serving a homemade treat that is both indulgent and wholesome.