
Introduction
No-bake desserts have earned their place as a beloved choice among home cooks and dessert enthusiasts, and it’s easy to see why. These delightful creations offer a perfect blend of convenience and flavor, allowing anyone to whip up a sweet treat without the hassle of an oven. Among the myriad of no-bake options, no-bake peanut butter cups stand out as a timeless favorite. This indulgent treat marries the rich, creamy flavor of peanut butter with the luxurious taste of chocolate, making it an ideal snack for any occasion—be it a casual gathering, a festive celebration, or simply a well-deserved reward after a long day.
In this article, we will delve into the delightful process of making these no-bake peanut butter cups. With just a handful of simple ingredients and a few easy steps, you’ll soon find yourself enjoying these irresistible confections right from your own kitchen.
Understanding the Appeal of No-Bake Peanut Butter Cups
The charm of no-bake peanut butter cups lies in their simplicity and versatility. Here are a few reasons that contribute to their widespread popularity:
The Balance of Flavors
At the heart of no-bake peanut butter cups is a harmonious blend of flavors. The combination of sweet, salty, and nutty elements creates a taste experience that is both satisfying and comforting. The creamy texture of peanut butter contrasts beautifully with the smooth, glossy layer of chocolate, while a touch of sweetness from the powdered sugar ties everything together. This balance makes each bite a delicious adventure for the palate.
Ideal for Various Dietary Preferences
One of the significant advantages of these peanut butter cups is their adaptability to different dietary preferences. Whether you’re a fan of natural peanut butter or need to cater to gluten-sensitive guests, this recipe can easily accommodate various needs. By using natural peanut butter and gluten-free graham cracker alternatives, you can create a treat that everyone can enjoy without sacrificing flavor or texture.
A Time-Saver in the Kitchen
No-bake peanut butter cups are a dream for those looking to save time in the kitchen. With minimal preparation required and no baking equipment needed, these treats can be made quickly and efficiently. This means less time spent cleaning up and more time indulging in the sweet rewards of your labor.
Ingredients Breakdown
Before diving into the steps to create these delicious no-bake peanut butter cups, let’s take a closer look at the key ingredients that bring this recipe to life:
Creamy Peanut Butter
The star of the show, creamy peanut butter, provides the rich and nutty flavor that makes these cups so irresistible. Its smooth texture not only enhances the taste but also contributes to the overall mouthfeel of the treat. Opt for a high-quality peanut butter with minimal additives for the best results.
Powdered Sugar
Powdered sugar plays a crucial role in this recipe by adding sweetness and helping to bind the peanut butter mixture together. Its fine texture allows it to blend seamlessly with the peanut butter, ensuring a smooth and creamy filling. If you’re looking for a healthier option, consider using a natural sweetener like maple syrup or agave nectar, adjusting the quantity to maintain the desired consistency.
Pure Vanilla Extract
A splash of pure vanilla extract elevates the overall flavor profile of the peanut butter cups. This ingredient adds depth and warmth, enhancing the nutty notes of the peanut butter while complementing the sweetness of the chocolate. Always use pure vanilla extract for the best flavor; imitation vanilla can fall short in taste.
Graham Cracker Crumbs
Graham cracker crumbs introduce a delightful crunch that contrasts beautifully with the smoothness of the peanut butter filling. They also help to absorb excess moisture, ensuring that the filling holds its shape. For a gluten-free alternative, substitute traditional graham crackers with gluten-free versions or crushed nuts.
Semi-Sweet Chocolate Chips
The indulgent layer of semi-sweet chocolate chips is what brings these peanut butter cups together. Melting the chocolate creates a smooth, glossy coating that envelops the peanut butter filling, providing a rich chocolate flavor that balances the sweetness of the peanut butter. You can also experiment with milk chocolate or dark chocolate for varied taste experiences.
Coconut Oil or Unsalted Butter
The inclusion of coconut oil or unsalted butter is essential for achieving that silky smooth chocolate layer. These fats help to create a luscious texture and ensure the chocolate hardens properly. If you’re looking for a dairy-free option, coconut oil is a fantastic choice that also imparts a subtle flavor.
Sea Salt
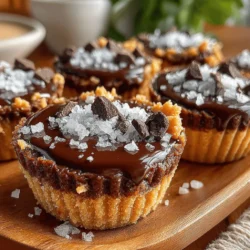
Though optional, a sprinkle of sea salt on top of your finished peanut butter cups can elevate the flavors to new heights. The salt enhances the sweetness and adds an extra layer of complexity, making each bite even more enjoyable.
Initial Steps Involved
Now that we’ve covered the key ingredients, let’s outline the initial steps to begin your journey in creating these delectable no-bake peanut butter cups.
1. Prepare Your Workspace: Start by gathering all your ingredients and tools. You will need a mixing bowl, a microwave-safe bowl for melting chocolate, a spatula, and a muffin tin lined with cupcake liners. This preparation will streamline the process and make it easier to follow along.
2. Mix the Peanut Butter Filling: In a mixing bowl, combine your creamy peanut butter, powdered sugar, graham cracker crumbs, and pure vanilla extract. Use a spatula or wooden spoon to mix the ingredients until they form a smooth and cohesive filling. The mixture should be thick but spreadable; if it feels too dry, add a touch more peanut butter.
3. Melt the Chocolate: In a microwave-safe bowl, add your semi-sweet chocolate chips and either coconut oil or unsalted butter. Microwave in short intervals, stirring between each, until the chocolate is completely melted and smooth. Be cautious not to overheat the chocolate, as it can seize and become unusable.
4. Layer the Chocolate: Spoon a small amount of the melted chocolate into the bottom of each cupcake liner, creating a base layer that will act as the foundation for your peanut butter filling. Use a spoon or brush to spread the chocolate evenly, ensuring it covers the bottom of the liner.
5. Add the Peanut Butter Mixture: Once the chocolate base has set slightly, carefully spoon the peanut butter mixture on top, filling each liner about two-thirds full. Press down gently to ensure that the filling adheres well to the chocolate base.
With these initial steps completed, you are well on your way to creating these irresistible no-bake peanut butter cups. The next phase will involve finishing touches and chilling the treats until they are ready to be enjoyed. Stay tuned as we explore the final steps in this delicious process.
{{image_2}}
Step-by-Step Instructions
Creating your own no-bake peanut butter cups is an easy and rewarding experience. Follow these detailed instructions to ensure your treats turn out perfectly every time.
Preparing the Peanut Butter Mixture
Start by gathering your ingredients: creamy peanut butter, powdered sugar, and a pinch of salt. The key to a smooth and delicious peanut butter filling is thorough mixing. In a medium bowl, combine 1 cup of creamy peanut butter with ½ cup of powdered sugar and a ¼ teaspoon of salt. Use a spatula or a hand mixer to blend the ingredients together until the mixture is creamy and smooth. Make sure there are no lumps; this ensures a delightful texture throughout your peanut butter cups.
Mold the Peanut Butter Cups
Next, it’s time to mold your peanut butter cups. Prepare a muffin tin by lining it with paper muffin liners. This step is crucial for easy removal later. Using a tablespoon, scoop about 1 tablespoon of the peanut butter mixture into each liner and press it down firmly to create an even base. It’s essential to ensure that the mixture is spread evenly across the bottom of the liner. This forms the foundation of your peanut butter cups, which will balance perfectly with the chocolate layer.
Melting the Chocolate
Now, let’s move on to the chocolate layer. You’ll need 1 cup of chocolate chips (dark, milk, or a combination) depending on your preference. Place the chocolate chips in a microwave-safe bowl and microwave them in 30-second intervals, stirring in between until fully melted. This method helps prevent overheating and ensures a smooth consistency. If you find the chocolate is too thick, you can add a teaspoon of coconut oil to help it achieve a more pourable texture.
Adding the Chocolate Layer
Once your chocolate is melted and smooth, it’s time to add the chocolate layer on top of the peanut butter base. Using a spoon, carefully pour about 1 tablespoon of melted chocolate over each peanut butter cup. Gently tilt the muffin tin to help spread the chocolate evenly across the top. Aim to cover the peanut butter mixture completely for that perfect bite. It’s perfectly fine if the chocolate layer is a bit thicker; it adds to the indulgence!
Chilling and Setting
After you have added the chocolate layer, it’s crucial to chill the peanut butter cups for the chocolate to set properly. Place the muffin tin in the refrigerator for at least 1 hour. This chilling time allows the chocolate to harden, resulting in a perfectly formed peanut butter cup. For best results, avoid the temptation to remove them too soon; patience here pays off!
Serving Suggestions
Once your no-bake peanut butter cups have set, it’s time to enjoy them! Here are some creative serving suggestions to elevate your experience.
Pairing with Beverages
These peanut butter cups are rich and satisfying, making them an excellent treat to pair with beverages. Consider serving them with a hot cup of coffee to balance the sweetness. The bitterness of coffee complements the creamy peanut butter and rich chocolate beautifully. Alternatively, a glass of cold milk can enhance the experience, making it a nostalgic treat reminiscent of childhood.
Presentation Ideas
If you’re looking to impress guests or create a delightful gift, consider how you present your no-bake peanut butter cups. Arrange them on a decorative plate or tiered cake stand for a stunning display. For gifting, place them in a decorative box or a mason jar tied with twine. Adding a little tag with a sweet note can make your gift even more special.
Variations
While the classic peanut butter cup is always a hit, don’t hesitate to get creative! Experiment with toppings by sprinkling crushed nuts, sea salt, or even colorful sprinkles on top of the melted chocolate before it sets. You can also try using different types of chocolate, such as white chocolate or dark chocolate, to suit your taste preferences. For a nutty twist, add a layer of crushed pretzels or graham crackers to the peanut butter mixture for added texture.
Storing Your No-Bake Peanut Butter Cups
To keep your delicious creations fresh, it’s essential to store them properly.
Best Practices for Storing in the Refrigerator
Once your peanut butter cups are fully set, remove them from the muffin tin and place them in an airtight container. Layer them with parchment paper to prevent sticking if you’re stacking them. When stored in the refrigerator, they can last for up to 2 weeks. This makes them a fantastic treat to have on hand for unexpected guests or when you crave something sweet!
Freezing Options
If you want to extend the shelf life of your no-bake peanut butter cups, freezing is a great option. Place the cups in a single layer on a baking sheet and freeze until solid. Once frozen, transfer them to an airtight container or a resealable freezer bag, separating layers with parchment paper. They can be stored in the freezer for up to 3 months. When you’re ready to enjoy, simply remove a few cups and let them thaw in the refrigerator or at room temperature.
Conclusion
No-bake peanut butter cups are not only an easy and delightful dessert to whip up but also a versatile treat that can be enjoyed in various ways. With just a handful of ingredients and a little patience, you can create this classic dessert that is sure to please family and friends. Whether you’re indulging yourself or sharing with loved ones, these peanut butter cups are a sweet reminder of how simple ingredients can come together to create a truly irresistible treat.
So go ahead, gather your ingredients, and get started on this delicious journey. Your taste buds will thank you!