
Fruity Bliss Frozen Smoothie Fruit Pops: A Refreshing Treat for All Ages
As the days grow longer and warmer, the allure of frozen treats becomes undeniable. Whether lounging by the pool, enjoying a picnic in the park, or simply seeking relief from the summer heat, frozen popsicles have become a staple delight for people of all ages. While store-bought options may be convenient, they often come packed with added sugars, artificial flavors, and preservatives. In contrast, homemade frozen treats present a unique opportunity to craft delicious snacks using fresh, wholesome ingredients, making them not only more nutritious but also customizable to suit individual tastes.
Enter the “Fruity Bliss Frozen Smoothie Fruit Pops.” These delightful popsicles merge the refreshing flavors of mixed fruits with the creamy goodness of yogurt, resulting in a vibrant and nutrient-rich treat that caters to both kids and adults alike. Packed with vitamins and minerals, these smoothie pops are an excellent way to indulge in a guilt-free dessert while keeping hydration and nutrition in check.
Understanding the Ingredients
To create the perfect Fruity Bliss Frozen Smoothie Fruit Pops, it’s essential to understand the key ingredients that contribute to their delicious taste and health benefits.
Mixed Frozen Fruit
The cornerstone of any great fruit pop is, of course, the fruit itself. Using a mix of frozen fruits not only enhances the flavor profile but also provides a range of nutrients. Berries, bananas, mangoes, and peaches come together to create a colorful and delicious combination that is rich in antioxidants, vitamins, and dietary fiber. When selecting mixed frozen fruit, consider opting for organic varieties to minimize exposure to pesticides and maximize health benefits.
Coconut Water
Hydration is crucial, especially during those hot summer months when outdoor activities abound. Coconut water serves as an excellent base for these smoothie pops, offering natural electrolytes that help keep the body hydrated. It also lends a subtle sweetness without the need for excessive added sugars, making it an ideal choice for those looking to maintain a balanced diet.
Greek Yogurt
To achieve that creamy texture that makes these pops irresistible, Greek yogurt is a must-have ingredient. Not only does it add a rich and luscious mouthfeel, but it also packs a protein punch that contributes to satiety. Additionally, Greek yogurt is a source of probiotics, which can support gut health. When choosing yogurt, opt for plain varieties that are free from added sugars to keep your fruit pops as healthy as possible.
Natural Sweeteners
While the natural sweetness of fruits and coconut water may suffice for many, some may prefer a touch more sweetness. Enter natural sweeteners like honey or maple syrup. These alternatives not only enhance the flavor but also provide additional nutrients compared to refined sugars. Honey, for instance, boasts antioxidant properties, while maple syrup contains essential minerals such as manganese and zinc. When incorporating sweeteners, it’s important to taste as you go, ensuring you achieve the desired level of sweetness without compromising the health benefits.
Optional Ingredients
For those looking to elevate their Fruity Bliss Frozen Smoothie Fruit Pops further, there are a few optional ingredients that can enhance flavor and nutrition. Consider adding a splash of vanilla extract for an aromatic note or a handful of spinach for an extra boost of vitamins and minerals without altering the taste significantly. You can also experiment with different nut butters for added creaminess and healthy fats.
Step-by-Step Guide to Making Fruity Bliss Frozen Smoothie Fruit Pops
Now that we’ve covered the essential ingredients, let’s dive into the step-by-step process of making these delightful smoothie pops. This detailed guide ensures that you’ll be able to replicate the recipe effortlessly, resulting in a refreshing treat that your family will love.
Blending the Base
Begin by gathering your ingredients: a mix of frozen fruits, coconut water, Greek yogurt, and any optional sweeteners or extras you wish to include. In a high-speed blender, combine approximately two cups of mixed frozen fruit with one cup of coconut water and one cup of Greek yogurt. Blend on high until the mixture is smooth and creamy, taking care to scrape down the sides as necessary. The goal is to achieve a uniform texture without any large chunks of fruit, as this will affect the popsicle’s final consistency.
Tasting and Adjusting
After blending, it’s time to taste the mixture. This step is crucial, as it allows you to adjust the flavor to your preference. If the mixture is too tart, consider adding a tablespoon of honey or maple syrup, blending again to incorporate. If desired, you can also add a splash of vanilla extract or a handful of spinach at this point. Remember, the final flavor should be a harmonious blend of sweetness and fruitiness, so taste as you go.
Filling the Molds
Once you’re happy with the flavor, it’s time to fill your popsicle molds. Carefully pour the blended mixture into each mold, leaving a small amount of space at the top to allow for expansion during freezing. To avoid any mess, you might find it helpful to use a funnel or a measuring cup with a spout. If you’re adding layers or swirls, pour in a little of one mixture, then add another flavor before topping it off with more of the original mixture.
Inserting Sticks
After filling the molds, insert the popsicle sticks into the center of each mold. Ensure that the sticks are positioned straight and centered, as this will help maintain even freezing and stability during the removal process. If your molds come with lids, snap them on to keep the mixture contained and prevent ice crystals from forming.
Freezing Process
Now comes the most challenging part—waiting for the pops to freeze. Place your filled molds in the freezer for at least four to six hours, or until completely solid. If you’re in a hurry, you can check the consistency after a few hours; however, for the best results, allowing them to freeze overnight is ideal.
Removal Techniques
Once the pops are frozen solid, it’s time to enjoy your creations. To remove the pops from the molds, you may need to run warm water over the outside of the molds for a few seconds to loosen them. Alternatively, gently twisting the molds can help release the pops. If you encounter any resistance, avoid yanking on the sticks, as this might cause them to break. Instead, be patient and try the warm water method for a smoother release.
With these initial steps, you are well on your way to creating the perfect Fruity Bliss Frozen Smoothie Fruit Pops. Their vibrant colors, delightful flavors, and healthful ingredients make them a fantastic choice for a refreshing summer treat that everyone will love. Stay tuned for the next section, where we’ll explore further variations and tips to perfect your homemade popsicle experience.
{{image_2}}
The Benefits of Homemade Popsicles
When it comes to frozen treats, homemade popsicles, such as the Fruity Bliss Frozen Smoothie Fruit Pops, offer numerous advantages over their commercial counterparts. One of the most significant benefits is nutritional content. Commercial popsicles often contain excessive amounts of added sugars, artificial flavors, and preservatives. On the other hand, by making your popsicles at home, you have complete control over the ingredients. You can create a healthier treat by using ripe, fresh fruits, which are rich in vitamins, minerals, and antioxidants.
Another compelling reason to opt for homemade popsicles is the ability to cater to various dietary restrictions. Whether you’re vegan, lactose intolerant, or following a specific health regimen, DIY popsicles can be tailored to meet those needs. By using plant-based milks like almond or coconut instead of dairy, you can create delicious, creamy pops that everyone can enjoy. Moreover, you can sweeten your pops with natural sweeteners such as honey or maple syrup, or even skip the sugar altogether by relying on the natural sweetness of fruits.
In addition to providing healthier alternatives, homemade popsicles allow for the avoidance of preservatives and artificial colors. These additives are often found in store-bought versions and can have adverse health effects when consumed regularly. By making your own, you ensure that every ingredient is wholesome and fresh, giving you peace of mind while you indulge in a refreshing treat.
Creative Variations on the Fruity Bliss Pops
While the original Fruity Bliss Frozen Smoothie Fruit Pops recipe is delicious as is, the beauty of homemade popsicles lies in their versatility. Here are some creative variations to enhance your fruity pops:
Different Fruit Combinations
Experimenting with various fruit combinations can yield exciting new flavors. For example, try blending tropical fruits like mango and pineapple for a refreshing island twist. Or combine berries such as blueberries, strawberries, and raspberries for a berry burst packed with antioxidants. For a tangy kick, consider adding citrus fruits like oranges or lemons to your blend. The options are endless, allowing you to discover your favorite flavor profiles.
Alternative Bases
To accommodate different dietary preferences, consider using alternative bases. For those who are lactose intolerant or following a vegan diet, almond milk, coconut milk, or even fruit juice can serve as excellent bases. Almond milk offers a nutty flavor, while coconut milk provides a creamy texture that mimics dairy. If you prefer a lighter option, fruit juices can be a fantastic choice, especially when using freshly squeezed juices for a vibrant taste.
Adding Greens
For an extra nutrient boost, consider incorporating greens into your pops. Spinach or kale can be added to your fruit blends without altering the taste significantly. Not only will this enhance the nutritional value of your pops, but it will also introduce a beautiful green hue, making them visually appealing. Simply blend a handful of greens with your fruits and base, and you’ll have a healthy treat that kids and adults alike will enjoy.
Presentation Ideas for Serving Fruity Bliss Pops
Presentation can elevate your homemade popsicles from simple treats to stunning desserts. Here are some creative serving ideas to make your Fruity Bliss Frozen Smoothie Fruit Pops visually appealing:
Creative and Colorful Serving Suggestions
One way to make your pops stand out is to serve them on a colorful platter. Arrange the pops in a rainbow pattern, grouping similar colors together for a vibrant display. You can also use clear glass cups or mason jars filled with crushed ice to stand the pops upright, creating an eye-catching centerpiece for gatherings.
Importance of Garnishing
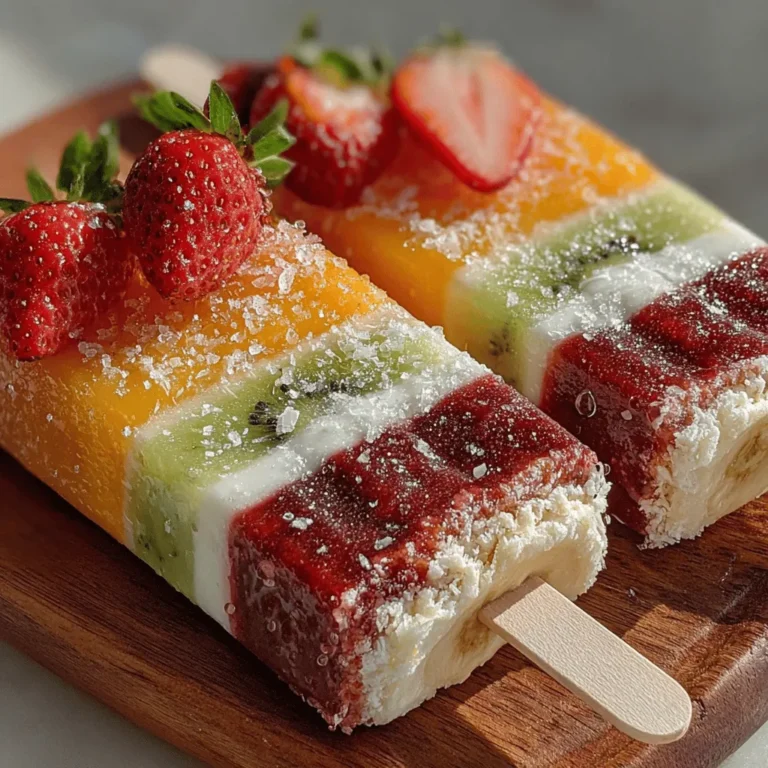
Garnishing your pops can add an extra touch of elegance. Consider topping your pops with fresh fruit slices, like kiwi or strawberries, for a pop of color. Mint leaves can provide a refreshing aroma and a splash of green, while edible flowers can add a whimsical touch. Not only do these garnishes enhance the aesthetic appeal, but they can also complement the flavors of your pops.
Fun Serving Styles
Explore fun serving styles to make your pops even more exciting. For a summer party, consider placing the pops on a dessert table alongside other treats, creating a festive atmosphere. You can also serve them in a lineup, with each pop labeled for flavor, allowing guests to choose their favorites. Whatever style you choose, make sure it reflects the fun and joy of enjoying homemade frozen treats.
Storing and Enjoying Your Pops
To maintain the freshness and flavor of your Fruity Bliss Frozen Smoothie Fruit Pops, proper storage is essential. Here are some tips for storing your pops:
Tips on Storing Leftover Pops
Once your pops are fully frozen, remove them from the molds and wrap them individually in plastic wrap or store them in airtight containers. This will help prevent freezer burn and keep your pops tasting fresh. Be sure to label the containers with the date and flavor for easy identification later.
Ideal Timeframe for Consumption
For the best taste experience, it’s recommended to consume your homemade popsicles within three months of freezing. While they may last longer, the quality and flavor can diminish over time. To enjoy the pops at their peak, plan to enjoy them during the warmer months when a refreshing treat is most welcome.
Incorporating Popsicles into Gatherings
Homemade popsicles can be a fun addition to gatherings or parties. They can be served as a healthy dessert option or a refreshing snack during hot days. Consider offering a variety of flavors to cater to different palates, or create a “build-your-own popsicle” station, where guests can choose their fruit combinations and bases. This interactive experience allows everyone to get creative and enjoy the fun of making their frozen treats.
Conclusion
Making Fruity Bliss Frozen Smoothie Fruit Pops at home is not only simple but also incredibly rewarding. The ability to control ingredients ensures that you are indulging in a treat that is both delicious and healthy. With the numerous customization options available, you can cater to any dietary preference and satisfy varying taste buds.
From experimenting with different fruit combinations to incorporating greens for added nutrition, the possibilities are endless. Plus, with creative serving ideas and proper storage techniques, you can turn your popsicles into a delightful centerpiece for any occasion.
So, gather your favorite fruits, unleash your creativity, and enjoy the process of making these delicious frozen treats. Whether it’s for a family snack, a refreshing dessert, or a fun party treat, your Fruity Bliss Frozen Smoothie Fruit Pops are sure to bring joy and satisfaction to everyone who indulges in them. Happy blending!
