
Crispy Chicken Bacon Ranch Wraps Recipe
When it comes to satisfying meals that please the whole family, few dishes can compete with the classic chicken bacon ranch wrap. This delightful combination of crispy chicken, savory bacon, creamy ranch dressing, and fresh vegetables brings together an irresistible medley of flavors and textures that are sure to tantalize your taste buds. Whether you’re whipping up a quick weeknight dinner, hosting a gathering, or simply craving a comforting meal, these wraps offer a perfect solution.
The appeal of chicken bacon ranch wraps lies not only in their delicious taste but also in their versatility. They can be tailored to suit individual preferences, allowing for variations in ingredients while still delivering that signature crunch and flavor. Assembling these wraps is a straightforward process, making them an ideal choice for both novice cooks and seasoned home chefs alike.
Understanding the Ingredients
To create the ultimate chicken bacon ranch wraps, it’s essential to understand the key ingredients and their roles in elevating the dish.
Chicken is the star of the show, and when prepared correctly, it provides a juicy and tender base for the wrap. Marinating the chicken in buttermilk plays a crucial role in enhancing its flavor and tenderness. The acidity in buttermilk not only infuses the chicken with a subtle tang but also helps to break down the proteins, resulting in a moist and flavorful piece of meat.
Bacon adds a rich, savory note that complements the chicken beautifully. Its crispiness contrasts with the tenderness of the chicken and the creaminess of the ranch dressing, creating a harmonious blend of textures.
Ranch dressing is the creamy element that ties everything together. Its herby, tangy flavor brings a refreshing balance to the savory components of the wrap, making each bite satisfying.
Fresh vegetables such as lettuce and tomatoes provide a burst of color and crunch. These ingredients not only contribute to the overall flavor but also add a nutritional element to the wraps, making them a more balanced meal.
Cheese, often a key component in wraps, adds a creamy richness that enhances the overall taste. Opting for a cheese that melts well, like cheddar or Monterey Jack, can elevate the wrap to new heights.
Marinating the Chicken for Optimal Flavor
To begin crafting your crispy chicken bacon ranch wraps, the first step is to marinate the chicken. This crucial step ensures that the chicken remains juicy and flavorful throughout the cooking process. Here’s how to marinate chicken breasts effectively:
1. Choose Your Chicken: Start with boneless, skinless chicken breasts. The absence of bones and skin allows for quicker cooking and easier wrapping.
2. Prepare the Buttermilk Marinade: In a mixing bowl, combine buttermilk with your choice of seasonings. Common additions include garlic powder, onion powder, paprika, salt, and pepper. The spices not only enhance the flavor but also contribute to the overall complexity of the dish.
3. Marinate the Chicken: Submerge the chicken breasts in the buttermilk mixture, ensuring they are fully coated. Cover the bowl with plastic wrap or transfer the chicken to a resealable plastic bag, removing as much air as possible.
4. Refrigerate: For optimal flavor and tenderness, allow the chicken to marinate in the refrigerator for at least 1 hour; however, marinating for 4 to 6 hours—or even overnight—will yield even better results. The buttermilk works its magic during this time, infusing the chicken with flavor and moisture.
5. Before Cooking: Once marinated, remove the chicken from the refrigerator and let it sit at room temperature for about 15 minutes. This will ensure even cooking when it’s time to fry.
Preparing the Perfect Breading
The next step in creating these wraps is the breading process, which is essential for that coveted crispy exterior. Here’s how to achieve the perfect breading for your chicken:
1. Set Up the Breading Station: Create a three-step breading station — one for flour, one for the buttermilk marinade, and one for panko breadcrumbs.
2. Season the Flour: In a shallow dish, combine all-purpose flour with a pinch of salt, pepper, and any additional seasonings you prefer. This will help to elevate the flavor of the chicken, ensuring that every layer is seasoned.
3. Breading Process:
– First, remove the marinated chicken from the buttermilk, allowing any excess liquid to drip off.
– Dredge the chicken in the seasoned flour, ensuring it is evenly coated. Shake off any excess flour.
– Next, dip the floured chicken back into the buttermilk, allowing it to soak briefly before moving on to the final step.
– Finally, coat the chicken with panko breadcrumbs, pressing gently to ensure the breadcrumbs adhere well. The panko will create a light, airy crunch that is superior to regular breadcrumbs.
4. Rest the Breading: Allow the breaded chicken to sit for a few minutes before cooking. This resting period helps the breading adhere, reducing the chances of it falling off during frying.
Cooking Techniques for Crispy Chicken
When it comes to frying the chicken, the technique you choose can significantly impact the final texture. For optimal crispiness, skillet frying is highly recommended. Here’s how to do it effectively:
1. Heat the Oil: In a large skillet or frying pan, heat vegetable oil over medium-high heat. The oil should be hot enough that a breadcrumb dropped into it sizzles immediately. This ensures that the chicken will fry rather than steam, leading to a crispier texture.
2. Fry the Chicken: Carefully place the breaded chicken into the hot oil, ensuring not to overcrowd the pan. Fry in batches if necessary. Cook each piece for about 4 to 5 minutes on each side or until the chicken is golden brown and cooked through, reaching an internal temperature of 165°F (75°C).
3. Drain Excess Oil: Once cooked, transfer the chicken to a plate lined with paper towels to absorb any excess oil. This step is crucial for maintaining the crispiness of the breading.
As you prepare each component of your crispy chicken bacon ranch wraps, the anticipation builds. With each step, you are crafting a meal that is not only delicious but also packed with flavor and texture. The next part of this recipe will guide you through assembling the wraps and adding the finishing touches that will take your creation from simple to spectacular.
{{image_2}}
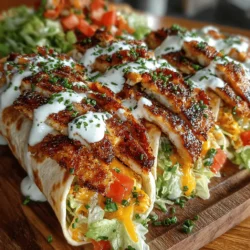
Crispy Chicken Bacon Ranch Wraps are not just a meal; they are a flavor-packed experience that combines the crunch of perfectly fried chicken, the savory goodness of bacon, and the creamy zing of ranch dressing, all wrapped up in a soft tortilla. This part of the recipe will guide you through ensuring your chicken is cooked to perfection, assembling the wraps for maximum flavor, and achieving that extra crispiness. We will also explore serving suggestions, nutritional insights, and finish with a delightful conclusion that will inspire you to try this recipe.
Ideal Oil Temperature for Frying Chicken
When frying chicken for your wraps, achieving the right oil temperature is crucial for obtaining that crispy exterior without compromising the juicy interior. The ideal temperature for frying chicken is between 350°F and 375°F (175°C to 190°C). To know when your oil is ready, you can use a thermometer for precision. If you don’t have one, a simple test is to drop a small piece of bread into the oil. If it sizzles and turns golden brown within about 60 seconds, your oil is at the right temperature.
Ensuring Chicken Reaches the Appropriate Internal Temperature
Food safety is paramount when cooking chicken. To ensure your chicken is safe to eat, it should reach an internal temperature of 165°F (74°C). The best way to check this is by using an instant-read meat thermometer, inserting it into the thickest part of the chicken. Once it reaches this temperature, you can be confident that your chicken is both juicy and safe to eat.
Assembling the Crispy Chicken Bacon Ranch Wraps
With your crispy chicken ready, it’s time to put together your wraps. Proper assembly is key to ensuring maximum flavor and ease of eating.
Step-by-Step Guide to Assemble the Wraps
1. Choose Your Tortilla: Start with a large flour tortilla. The size is essential for holding all your delicious fillings without tearing.
2. Spread the Ranch Dressing: Lay the tortilla flat on a clean surface. Generously spread ranch dressing across the center, leaving about an inch of space at the edges. The ranch dressing not only adds flavor but also acts as a barrier to keep the tortilla from getting soggy.
3. Layer the Ingredients:
– Crispy Chicken: Place a few pieces of your golden-brown chicken strips in the center.
– Crispy Bacon: Layer on the crispy bacon, broken into manageable pieces.
– Fresh Vegetables: Add a handful of fresh lettuce, diced tomatoes, and any additional toppings like sliced red onions or cucumber.
– Cheese: Sprinkle shredded cheese (cheddar or mozzarella works beautifully) over the top to complement the flavors.
4. Fold and Roll: To fold your wrap, start by pulling the sides in towards the center, then roll from the bottom up, tucking in the fillings as you go. This will help keep everything secure inside the tortilla.
Suggestions for Layering Ingredients
To prevent sogginess and maintain crispness, it’s important to layer ingredients strategically. Start with a layer of ranch dressing, which creates a moisture barrier. Next, place your crispy chicken and bacon, followed by the drier ingredients like lettuce and cheese. Avoid putting wet ingredients like tomatoes directly on the tortilla; instead, consider placing them on top of the drier ingredients to minimize moisture seeping into the wrap.
The Role of Ranch Dressing
Ranch dressing is not just a condiment in this recipe; it’s a flavor enhancer that ties all the ingredients together. The creamy texture and tangy flavor of ranch complement the savory chicken and bacon, adding an irresistible richness to every bite. Feel free to experiment with different flavored ranch dressings for a unique twist.
The Final Touch: Achieving Extra Crispiness
To take your wraps to the next level, consider pan-searing them for added texture.
Optional Step of Pan-Searing
After assembling your wraps, heat a non-stick skillet over medium heat and add a little oil. Place the wraps seam-side down in the skillet. Sear each side for 2-3 minutes until golden brown and crisp. This optional step transforms your wraps into a delightful crunchy experience, making each bite even more satisfying.
Tips for Perfect Golden-Brown Finish
1. Don’t Overcrowd the Pan: Frying too many wraps at once can lower the oil temperature, preventing that crispy finish. Fry in batches if necessary.
2. Keep an Eye on the Heat: Adjust the heat as needed. If the wraps are browning too quickly, lower the heat to ensure the inside is heated through without burning the outside.
3. Use Enough Oil: Ensure there’s enough oil in the pan to create a crispy exterior. A light coating is essential; too little oil can lead to sogginess.
Serving Suggestions and Pairings
Your Crispy Chicken Bacon Ranch Wraps are sure to be a hit, and they pair beautifully with a variety of side dishes and dips.
Ideas for Side Dishes
– Fresh Salads: A simple garden salad with mixed greens, cucumbers, and a light vinaigrette complements the richness of the wraps.
– Chips: Serve your wraps with tortilla chips and salsa or guacamole for a crunchy side.
– Veggie Sticks: Carrot and celery sticks with ranch or hummus for dipping are a great way to keep things light and fresh.
Suggestions for Dips
Enhance your dining experience by offering a selection of dips alongside your wraps:
– Extra Ranch Dressing: Always a favorite for dipping.
– Buffalo Sauce: For those who like a bit of heat, buffalo sauce adds a spicy kick.
– BBQ Sauce: The smoky flavor pairs wonderfully with the crispy chicken and bacon.
Garnishing the Wraps
Presentation matters, and garnishing your wraps can make them visually appealing. Consider adding:
– Chopped Fresh Herbs: A sprinkle of parsley or cilantro can add a fresh pop of color.
– Lime Wedges: Squeezing fresh lime over the wraps just before serving can brighten the flavors.
Nutritional Benefits of the Ingredients
While Crispy Chicken Bacon Ranch Wraps are indulgent, they can also be made more nutritious with thoughtful ingredient choices.
Overview of Nutritional Aspects
– Chicken: A great source of protein, essential for muscle repair and growth.
– Bacon: Adds flavor but should be consumed in moderation due to its fat content.
– Ranch Dressing: While creamy, opting for a lighter version or making your own can lower calorie intake.
– Vegetables: Adding fresh veggies increases fiber content and provides essential vitamins and minerals.
Balancing Indulgence with Healthier Choices
To enjoy these wraps as part of a balanced diet, consider incorporating a variety of vegetables. Leafy greens, tomatoes, and cucumbers not only add nutrition but also enhance the freshness of each bite. For those watching their calories, using whole-wheat tortillas can provide more fiber and nutrients compared to regular tortillas.
Portion Control
Enjoying these wraps can be part of a balanced meal plan. Consider serving half a wrap alongside a side salad to maintain portion control. This way, you can indulge without overdoing it.
Conclusion
Crispy Chicken Bacon Ranch Wraps are a satisfying, delicious, and versatile meal option that brings together a delightful combination of flavors and textures. From the crispy chicken and bacon to the creamy ranch dressing and fresh vegetables, each bite is a celebration of taste that can easily become a family favorite.
We encourage you to try this recipe and share it with friends and family for a delightful dining experience. The joy of cooking and enjoying homemade meals together is truly unmatched, and these wraps are sure to bring smiles to the table. Whether for a casual lunch, a picnic, or a quick dinner, these wraps are a fantastic choice that can be customized to suit everyone’s tastes. Happy cooking!