
Introduction
In a culinary world that increasingly embraces plant-based options, Zesty Lemon Garlic Roasted Chickpea Wraps stand out as a vibrant and delicious choice. These wraps are more than just a meal; they are a celebration of flavor and health, combining the earthy richness of chickpeas with the refreshing zing of lemon and the robust essence of garlic. Ideal for both vegetarians and those looking to incorporate more plant-based meals into their diet, this recipe is a testament to how satisfying and delightful meatless meals can be.
The popularity of plant-based eating has surged in recent years, driven by a growing awareness of health, sustainability, and ethical considerations surrounding food choices. Zesty Lemon Garlic Roasted Chickpea Wraps not only cater to this trend but also offer unparalleled convenience, making them perfect for busy weeknights or meal prep. With minimal preparation time and wholesome ingredients, this dish is as accessible as it is nourishing.
Understanding the Ingredients
At the core of the Zesty Lemon Garlic Roasted Chickpea Wraps are a few key ingredients that harmoniously blend together to create a flavor-packed experience. Each component plays a vital role in not just taste but also the nutritional profile of the dish.
The Nutritional Power of Chickpeas
Chickpeas, also known as garbanzo beans, are the star ingredient of this wrap. Renowned for their high protein and fiber content, these legumes serve as an excellent substitute for meat, providing the sustenance needed to keep you full and energized. A single cup of cooked chickpeas contains approximately 15 grams of protein and 12 grams of dietary fiber, making them a powerhouse of nutrition. This fiber content not only aids in digestion but also helps in maintaining stable blood sugar levels, contributing to overall health.
Moreover, chickpeas are rich in essential vitamins and minerals, including folate, iron, and magnesium. Their low glycemic index makes them a suitable choice for those managing their weight or blood sugar, further enhancing their appeal as a versatile ingredient in a variety of meals.
The Brightness of Lemon and Garlic
Complementing the chickpeas are the zesty notes of lemon and the aromatic punch of garlic. These ingredients are not only flavorful enhancers but also come packed with health benefits. Lemons are a fantastic source of vitamin C, a nutrient known for its immune-boosting properties. Vitamin C also acts as a potent antioxidant, protecting cells from damage and supporting skin health.
Garlic, on the other hand, has been celebrated for its medicinal properties for centuries. It is known to have anti-inflammatory and antibacterial effects, and some studies suggest that garlic may help reduce blood pressure and improve cholesterol levels. When combined, lemon and garlic elevate the overall flavor profile of the chickpeas, creating a perfectly balanced wrap that is both invigorating and satisfying.
Choosing the Right Wraps
The choice of wrap or tortilla is crucial in this recipe, as it serves as the vessel for all the delicious fillings. There are many options available, allowing you to cater the dish to your dietary preferences. Whole grain wraps are an excellent choice, providing additional fiber and nutrients compared to their white counterparts. They also offer a hearty texture that pairs well with the roasted chickpeas.
For those with gluten sensitivities, gluten-free wraps made from rice, corn, or chickpeas themselves are widely available and can easily be substituted in this recipe. Additionally, lettuce wraps provide a light and refreshing alternative, perfect for those seeking a low-carb option. When selecting a wrap, consider your dietary needs and personal taste to ensure the best experience.
Preparation Steps for the Perfect Wrap
Creating Zesty Lemon Garlic Roasted Chickpea Wraps is a straightforward process that begins with preparation. Following these steps will ensure that your wraps are not only delicious but also visually appealing.
Preheating the Oven
The first step in preparing your chickpea wraps is to preheat your oven to 400°F (200°C). Preheating is crucial for optimal roasting, as it allows the chickpeas to cook evenly and develop that desirable crispy texture. A hot oven ensures that the chickpeas roast rather than steam, resulting in a delightful crunch that enhances the overall eating experience.
Coating the Chickpeas
Once the oven is preheated, it’s time to prepare the chickpeas. Rinse and drain a can of chickpeas, or use cooked chickpeas if you prefer to prepare them from scratch. Pat them dry with a clean kitchen towel, as moisture can prevent them from crisping up in the oven. In a mixing bowl, toss the chickpeas with olive oil, freshly squeezed lemon juice, minced garlic, and a pinch of salt and pepper. The olive oil not only helps the chickpeas roast to perfection but also adds heart-healthy fats to the dish.
For those who enjoy a bit of spice, consider adding cayenne pepper or smoked paprika to the coating mixture. These spices can enhance the flavor profile and add a delightful kick to the wraps. Once the chickpeas are evenly coated, spread them out in a single layer on a baking sheet lined with parchment paper. This arrangement allows for even cooking and maximum crunchiness.
As we continue to explore the preparation process, the next steps will focus on roasting the chickpeas to perfection and assembling the wraps. This vibrant dish promises to be a staple in your kitchen, providing not just a meal, but a wholesome experience that delights the senses. Stay tuned for the next part of this flavorful journey!
{{image_2}}
Mixing the Chickpeas for Flavor
To ensure that your chickpeas are bursting with flavor, start by properly mixing them with olive oil, spices, and aromatics. Begin by draining and rinsing one can (15 ounces) of chickpeas. Pat them dry with a clean kitchen towel or paper towel to remove excess moisture—this step is crucial for achieving that crispy texture during roasting.
In a large mixing bowl, add the dried chickpeas, followed by 1 tablespoon of extra virgin olive oil. This not only helps the spices adhere but also adds a rich flavor. Now it’s time to season! Sprinkle in your chosen spices: 1 teaspoon of smoked paprika, ½ teaspoon of garlic powder, ½ teaspoon of onion powder, and salt to taste. For an extra zing, add the zest of one lemon and the juice of half.
Using a spatula or your hands, gently toss the chickpeas until they are evenly coated with the oil and spices. Make sure each chickpea is well-seasoned for optimal flavor. This step is essential; if the chickpeas are not evenly coated, some bites may be bland while others are overly spicy.
Roasting for Texture
The roasting process is where the magic happens. Preheat your oven to 400°F (200°C). Spread the seasoned chickpeas on a baking sheet lined with parchment paper, ensuring they are in a single layer. This allows for even roasting, which is key to achieving that perfect, crispy texture.
Once in the oven, roast the chickpeas for about 20-25 minutes. Halfway through, around the 12-minute mark, give the pan a good shake. This ensures that the chickpeas cook evenly and helps them crisp up on all sides. Keep an eye on them during the last few minutes to prevent burning; you want them golden brown and crunchy.
After roasting, remove the chickpeas from the oven and allow them to cool slightly. They will continue to crisp up as they cool, so don’t worry if they seem a bit soft right after taking them out.
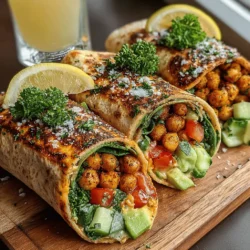
Assembling the Wraps
Now it’s time to assemble your zesty wraps! Start with a large whole wheat or gluten-free tortilla as your base. Lay it flat on a clean surface. Begin by adding a generous amount of hummus or a spread of your choice to the center of the tortilla, leaving about an inch of space from the edges. This will act as a creamy layer and also help hold the fillings in place.
Next, layer your roasted chickpeas evenly over the hummus. Follow this with a handful of fresh spinach or mixed greens for a refreshing crunch. For added flavor, include slices of ripe avocado, diced red onion, and chopped tomatoes. These ingredients not only enhance the taste but also create a visually appealing wrap with vibrant colors.
To finish off, drizzle a bit of extra lemon juice or your favorite dressing over the top, which will add brightness and moisture to the wrap. Remember, layering is essential for both flavor and aesthetics; you want to create a wrap that looks inviting and delicious.
Rolling Techniques for a Neat Finish
Rolling your wrap securely is crucial to prevent any fillings from spilling out during your meal. Start by folding the sides of the tortilla inwards over the fillings, almost like you’re tucking them in. Then, begin rolling the tortilla from the bottom up, making sure to keep the fillings tucked in as you roll.
Apply gentle pressure as you roll to ensure that it’s tight, but be careful not to squeeze too hard, as this could cause the wrap to tear. Once you reach the top, you can either leave the wrap as is or cut it in half for easier handling. Wrapping the entire wrap in parchment paper or foil can also help keep everything contained until you’re ready to eat.
Garnishing for Presentation
A well-garnished dish can elevate your meal from simple to spectacular. For these wraps, consider garnishing with fresh herbs such as chopped parsley, cilantro, or basil. Not only do herbs add a pop of color, but they also enhance the overall flavor profile of the dish.
You can also sprinkle some additional lemon zest on top for a vibrant finish. If you’re feeling adventurous, a drizzle of tahini sauce or a dollop of vegan yogurt can add creaminess and a delightful flavor contrast. Arranging the wraps on a platter with a few lemon wedges and extra herbs can make for a beautiful presentation, perfect for serving at gatherings or family dinners.
Serving Suggestions
When it comes to serving your Zesty Lemon Garlic Roasted Chickpea Wraps, the presentation can make all the difference. Place the wraps on a large serving platter, cut in half to reveal the colorful layers inside. This not only makes them easier to eat but also showcases the fresh ingredients.
Consider serving the wraps alongside a light salad, such as a cucumber and tomato salad dressed with olive oil and lemon juice. This bright, refreshing side complements the wraps perfectly and adds a crisp texture to your meal. Alternatively, a side of sweet potato fries or a light soup can round out the meal beautifully.
For a more substantial dining experience, you could pair the wraps with a side of quinoa tabbouleh or roasted vegetable medley. These side dishes not only enhance the flavors of the wraps but also promote a satisfying and balanced meal.
Pairing Recommendations
To enhance your dining experience, consider pairing your wraps with beverages that complement their vibrant flavors. A light, crisp white wine, such as Sauvignon Blanc, pairs beautifully with the zesty elements of the wraps. If you prefer non-alcoholic options, a sparkling water with a splash of lemon or a refreshing iced herbal tea can also be delightful.
For dessert, you may want to keep it light and simple. Fresh fruit, such as a mixed berry salad or a slice of citrus sorbet, can cleanse the palate and provide a sweet finish to your meal.
Storing Leftovers
If you find yourself with leftover wraps, proper storage is key to maintaining their freshness. Store the wraps in an airtight container in the refrigerator. It’s best to store the fillings separately from the tortillas to prevent the wraps from becoming soggy. If you’ve prepared extra roasted chickpeas, keep them in a separate container as well.
When ready to enjoy your leftovers, you can either eat them cold or pop them in the oven for a few minutes to warm them up. If you decide to reheat the wraps, consider wrapping them in foil to prevent them from drying out.
Conclusion
In summary, these Zesty Lemon Garlic Roasted Chickpea Wraps are not only easy to prepare but also packed with flavor, nutrition, and vibrant colors. They showcase the beauty of plant-based meals, making them a perfect addition to any diet. The combination of crispy roasted chickpeas, fresh vegetables, and zesty flavors creates a satisfying and wholesome meal that anyone can enjoy.
Encouraging readers to embrace plant-based meals, these wraps highlight the joy of cooking with fresh, wholesome ingredients. They are versatile enough to adapt to your taste preferences and dietary needs, making them a go-to recipe for busy weekdays or leisurely weekends. So, roll up your sleeves, gather your ingredients, and experience the delight of creating and devouring these delicious wraps!